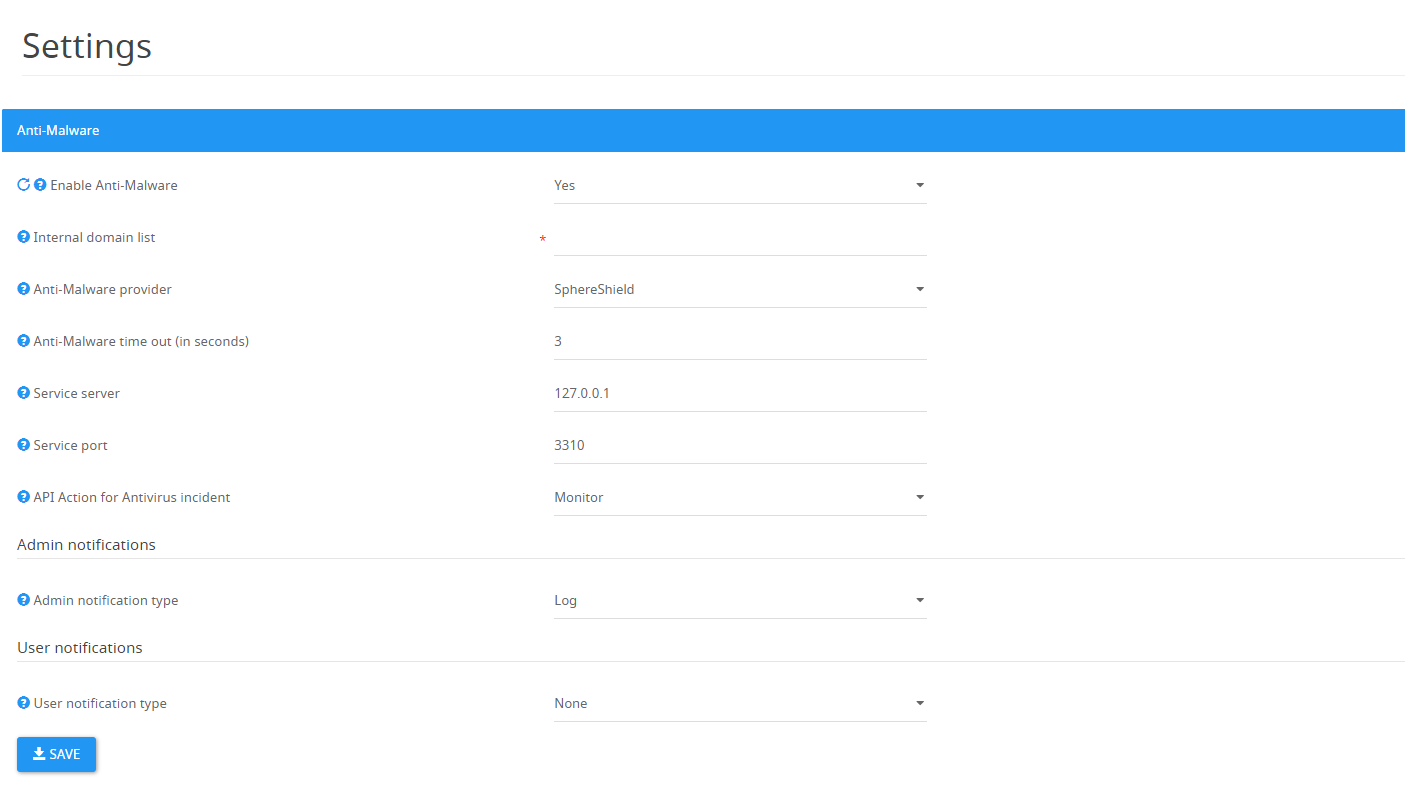
Enables scanning of files for Anti-Malware detection. Files which will be identified as infected will be deleted.
Anti-Malware Settings
1. Enable Anti-Malware - Set to 'Yes' in order to enable scanning for Anti-Malware detection.
** Need to restart the following back end components to apply modified settings: CASB Adapter service.
2. Internal domain list - List of local domain. Supports multiple values and wildcards '*'.
3. Anti-Malware provider - Provider for Anti-Malware inspection. SphereShield uses CLAMAV open source.
The other available option is McAfee.
4. Anti-Malware time out (in seconds) - Anti-Malware time out for waiting for response.
5. Service server - Server for ClamAV or McAfee server.
6. Service port - Port for ClamAV or McAfee server. Use 3310 for clamAV and 1344 for McAfee provider.
7.
8. Admin notification type - Notifications sent to the administrator when a malware incident occurs.
* Log - Log each incident to the log file , Windows Event log and database, or as defined in Log4Net configuration.
* Log, Email and IM - Incident will be logged and recipient specified in the DLP settings will be notified by email.
- Admin notification recipient (email) - This field accepts a comma separated list of addresses for more than one recipient, Example: user@domain.com, user2@domain.com.
- Admin notification recipient (IM) - This field accepts a comma separated list of addresses for more than one recipient, Example: user@domain.com, user2@domain.com.
- Admin notification message (for IM & email) - The following placeholders are available: {NEW_LINE},{USER},{RECIPIENT},{LOGGED_AT},{FILE_NAME}.
- Admin notification email subject - Email subject for admin notifications.
* Log, Email - Incident will be logged, email notification will be send and the sender will be notified by IM.
- Admin notification recipient (email) - This field accepts a comma separated list of addresses for more than one recipient, Example: user@domain.com, user2@domain.com.
- Admin notification message (for IM & email) - The following placeholders are available: {NEW_LINE},{USER},{RECIPIENT},{LOGGED_AT},{FILE_NAME}.
- Admin notification email subject - Email subject for admin notifications.
9 . User notification type - Notification send to an end-user when a malware incident occurs.
* None - No notification will be sent.
* IM - Incident will be send to an end user by IM.
User notification message - Message sent to the use in case a malware incident was identified, but only a monitoring action was taken.
* Email - Incident will be sent to and end-user by Email.
Anti-Virus ClamAV Installation and usage
ClamAV is a open source code that allows us to perform content scanning independently.
The code and its installation can be found at :https://www.clamav.net/downloads and windows version can be downloaded here: https://www.clamwin.com/content/view/18/46/
The Service
INSTALLATION:
- Copy the files to the Antivirus server (usually located in c:\agat\clamav).
- Make sure you also have the .\database directory.
- Configure the file clamd.conf, e.g: (address should be the Antivirus ip address)
TCPSocket 3310
MaxThreads 2
LogFile c:\agat\Logs\clamd.log
DatabaseDirectory C:\Agat\clamav\database
TCPAddr 192.168.1.61 (OPTIONAL)
LogTime true (OPTIONAL) - Configure the file freshclam.conf, e.g:
DatabaseMirror database.clamav.net
DNSDatabaseInfo current.cvd.clamav.net
DatabaseDirectory "C:\Agat\clamav\database"
MaxAttempts 3
NotifyClamd C:\Agat\clamav\clamd.conf
LogFileMaxSize 20480000
LogTime true
UpdateLogFile C:\Agat\Logs\freshclam.log Run the command: C:\(where the file-is located)\freshclam.exe --config-file c:\(Where-the-file-is-located)\freshclam.conf **This command refreshes the antivirus database and is not a must.
- Run the command:
C:\(where the file is located)\clamd.exe --install (Uninstall if you want to remove the service) **This command needs to be run from CMD as administrator. - You should see now a new service named: "
ClamWin Free Antivirus Scanner Service", in its properties, change is Startup type to "Automatic" and run the service.
The Program
INSTALLATION:
1 - Run the file: "clamav-0.99.2-x64.msi".
2 - Copy the folder "database" to the folder where the "clamscan.exe" placed (working directory).
USAGE:
1 - run the following command from the working directory:
clamscan -r -l <file to write the result to> <file to scan>E.G: "clamscan -r -l c:\Logs\scan_result.txt C:\virus_file.txt" results:
|


