How to install SphereShield for Skype for Business with the Initial Configuration
In this KB we are going to learn how to make the initial configuration using the SphereShield Installer
Installation Overview
The install process requires a one-time configuration done by running the setup. It is similar to configuring SfB topology.
Configuration info is stored in both “setup.properties” and “setup.properties.user”.
The “.properties” files need to be copied from the machine which the initial configuration was done on to the target server(s) needed for each component together with the setup itself.
When running the setup with the configuration file it will jump straight to the ‘install’ stage in the wizard.
Note that if they are to be moved between servers they need to be placed under the “SkypeShield.Setup ”folder which is created when running the Installer EXE.
When first running the Installer EXE file it will first self-extract and create a folder at the same location named “SkypeShield.Setup” This folder will contain 3 folders:
• Payload – A clean copy of every component and other installation tools and scripts
• Prerequisites – All the different prerequisites needed for the installer as well as for the different components (.NET, C++ Redistributable etc.)
• Scripts – The installation scripts that the installer will use to install the different components
Installation
Right-click the SphereShield .exe file and run as an administrator.
In the following window choose SphereShield for Skype for Business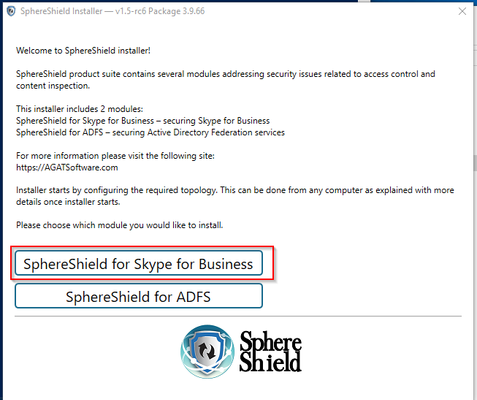
If no user properties file was detected you will be prompted by a pop-up message to choose one.
Since this is your first time configuring SphereShield you won't have that file, so just click no and move on
Next, the welcome page will open up. Here you can read a brief overview of our product, SphereShield for Skype for Business.
After you're done, click next and move on to the next page: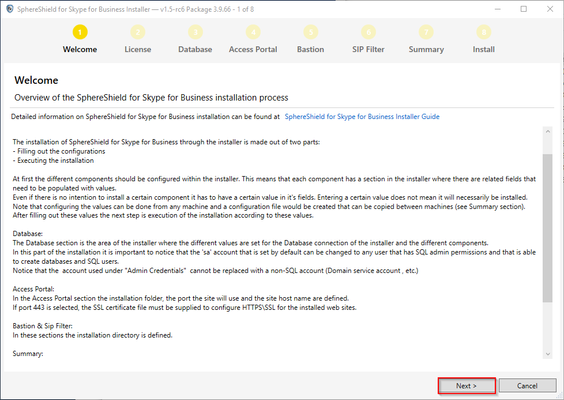
Now you will be prompted with End User License Agreement (EULA).
After you're done reading click next.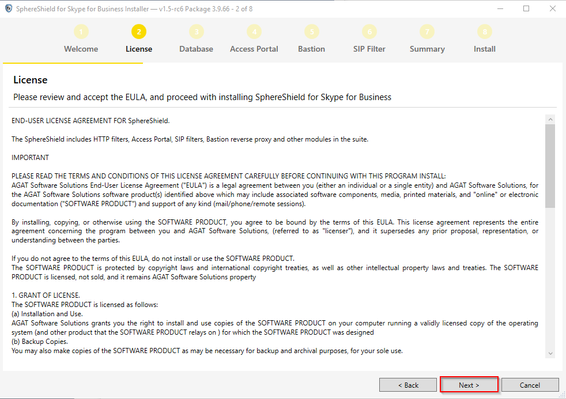
Database Configuration
In this page, we will need all the required details for SQL database connection and creation.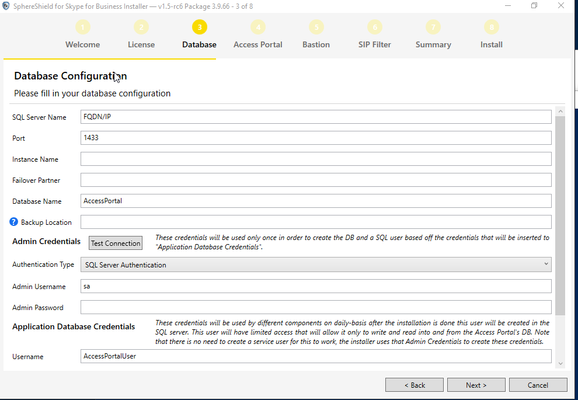
SQL Server Name - the FQDN or IP of your SQL server.
Port - the port you've configured for SQL connection (default is 1433).
Instance name - the name of the SQL instance on which you want to install the database
Failover Partner - the node name for the secondary mirrored database.
Database Name - the name for the database.
Backup Location - only needed for upgrades to allow the database to be backed up before the update.
Admin Credentials - These credentials will only be used once in order to create the database. You may use your current windows credentials (as long as you have the required permissions) or SQL permissions.
Application Database Credentials - this user will be created during the installation and it will have limited access that will only allow it to have R/W permission for the Admin Portal's database.
Click test connection in order to verify correct database configuration. A successful attempt should like so (with variation depending on your admin portal version):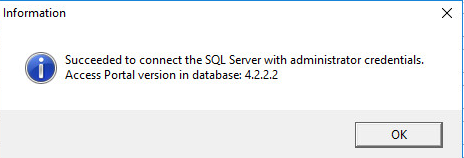
Click next and move on.
Admin Portal:
The next page in the installer will be Admin Portal Configuration: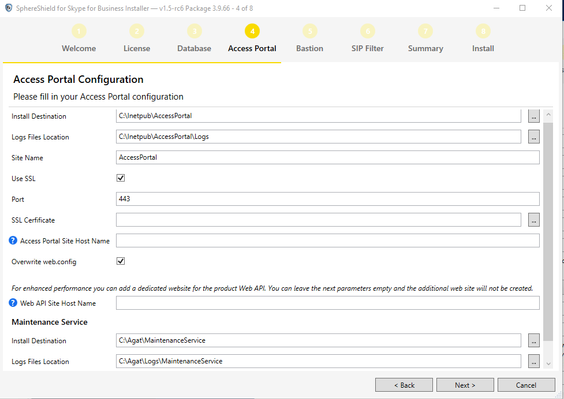
Install Destination -The location on the server of the Admin Portal
Log Files Location - Where should the log files of the Admin Portal be stored. If the server has a D: drive then this should be set to store logs there instead of on the System drive.
Site Name - the name of the site to appear in the IIS.
Use SSL- a checkbox to determine whether to configure SSL to the Admin Portal site.
Port - The port to be used for connection to the site (make sure that the port is not used by other sites).
SSL Certificate - SSL certificate for a secure connection to the site (in the case where it's checked).
Overwrite web.config - not relevant for a fresh install
Access Portal/Web API Site Host Name - relevant only in high-performance scenarios, this will create a dedicated web site to support the Access Portal Web API.
Maintenance Service
Install Destination - where should the maintenance service be installed.
Log Files Location - where the log files of the maintenance service are stored.
Click next and move on to the next page.
Bastion
In this page, we will be able to add the Bastion Reverse Proxy configuration:

DMZ Bastion
Install Destination - Where should the Bastion be installed.
Log File Location - Where the log files of the Bastion and its filters are stored.
Authentication Extender
Install Destination - Where should the Authentication Extender be installed.
Log Files Location - Where the log files of the Authentication Extender are stored
Front End and CAS Computer Names - the computer names of the servers as they appear in the Active Directory. The Authentication Extender will be delegated to act on behalf of them.
Install AGAT Bastion Agent
Bastion Agent Install Destination - Where should the Bastion Agent be installed.
Log Files Location - Where the log files of the Bastion Agent are stored.
Bastion IP - The IP address of the Bastion (should be 127.0.0.1 unless multiple listeners are required).
Bastion Healthcheck Host Name - the host to which to send the health-check response (should be your lyncdiscover address).
Install SphereShield Manager - this feature is still in beta. Do not check this box.
Click next and move on to the next step.
SIP Filter
In this page, the initial configuration for the SIP Filter can be done:
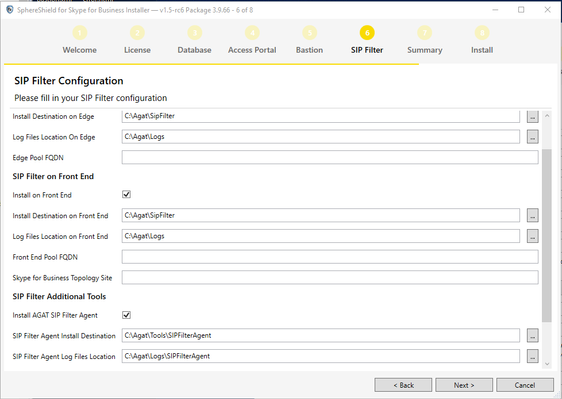
SIP Filter on Edge
Install Destination on Edge - the location of the SIP Filter on the Edge server.
Log File Location on Edge - the location of the log file of the SIP Filter on the Edge server.
Edge Pool FQDN - the name of the edge pool as defined in the Skype for Business topology. The installer will create a New-CSServerApplication Power Shell script based on this record.
SIP Filter on Front End
Install Destination on Edge - the location of the SIP Filter on the Front End server.
Log File Location on Edge - the location of the log file of the SIP Filter on the Front End server.
Front End Pool FQDN - the name of the Front End pool as defined in the Skype for Business topology. The installer will create a New-CSServerApplication Power Shell script based on this record.
Skype for Business Topology Site - the name of the site as defined in the topology. This will be used for UCMA integration.
SIP Filter Agent
SIP Filter Agent Install Destination - the location of the SphereShield Services Agent on the server
Sip Filter Agent Log Files Location - where the log files of the SphereShield Services Agent should be stored
Install SphereShield Manager - you should not check this box, this feature is still under development.
Click Next and move onto the next page.
ACM - Agat Content Manager
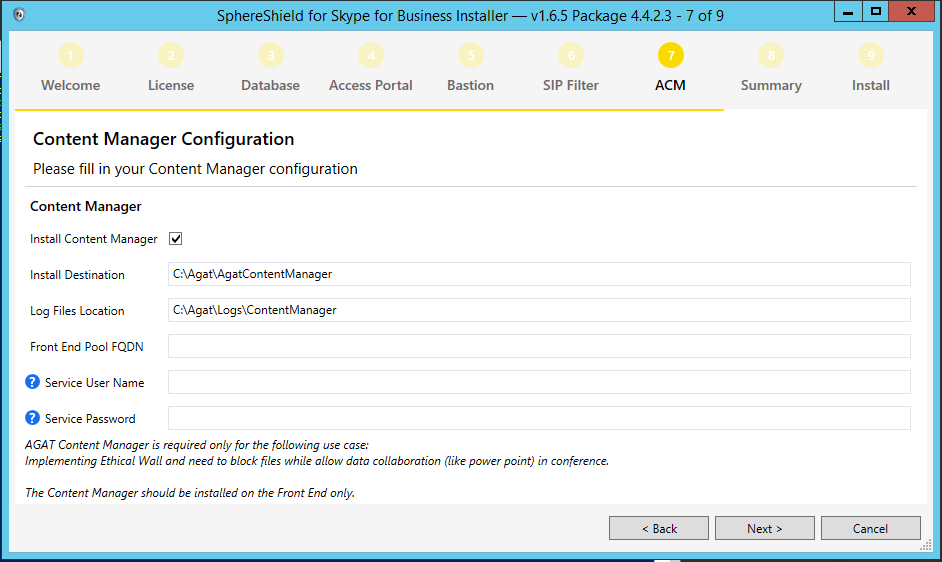
Install Destination - the location of the Agat Content Manager on the server.
Logs Files Destination - the location of the Agat Content Manger's logs files on the server.
Front End Pool FQDN - the name of the Front End pool as defined in the Skype for Business topology.
Service User Name - a domain user to be used by the service
Service Password -the password of a domain user to be used by the service
Click  and proceed to the next page.
Summary
In this page, you'll be able to review your current configuration before moving forward and beginning the installation.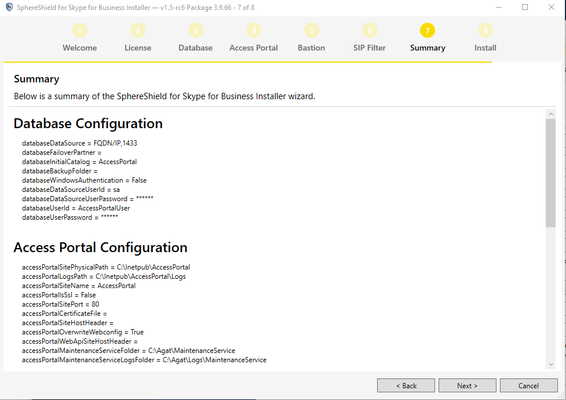
After you've confirmed that all your settings have been set up correctly press next and move on to the installation phase.
In the next page simply click finish: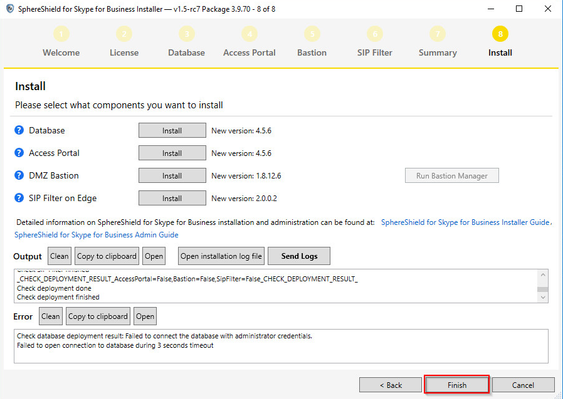
For future installations, take note that the default location of the setup.properties.user file is at:
C:\Agat\SphereShield.Setup\setup.properties.user