How to Install Bastion and SfB Reverse Proxy Filters
In this KB we are going to learn how to install and configure Bastion Reverse Proxy and its filters (EWS and LAC).
If you have done that already please make sure to configure all the initial settings in the installer by following this KB.
Refer to Bastion Folder Structure regarding the folder structure
Installing the Bastion Reverse Proxy
1. Right-click the installer and choose to run as administrator.
When this window pops up select SphereShield for Skype for Business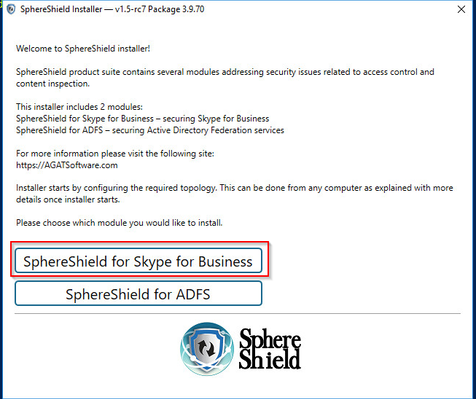
If no user properties file was detected you will be required to choose one.
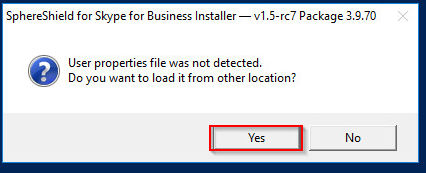
Its default location is: C:\Agat\SphereShield.Setup\setup.properties.user
2. On the install page click install next to DMZ Bastion: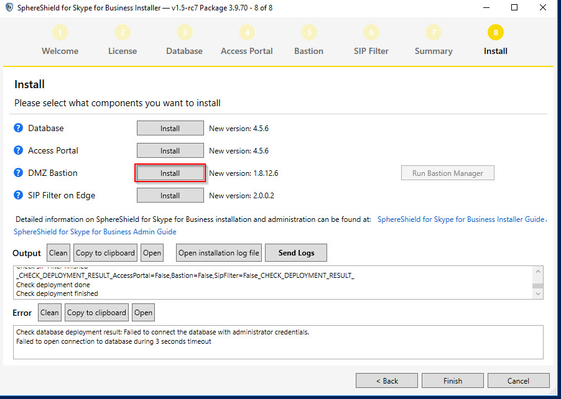
C++ 2015 redistributable will be installed automatically during the installation process in case they are not present
A restart might be required in case the installation is needed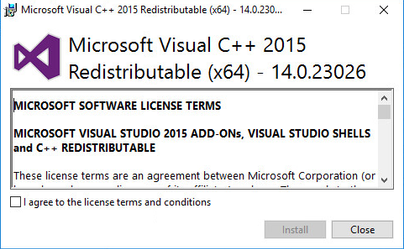
3. After a successful installation, you should see a green checkmark ( ) next to 'DMZ Bastion' in the installer.
4. Validate the installation - For any issues please refer to the installation log file by clicking the 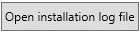 button.
After completing the installation make sure that the Bastion service has been created: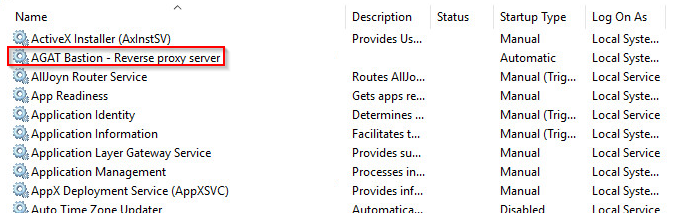
Bastion initial configuration
Configure the Listeners
Go to the bastion.xml (located by default at “c:\Agat\Bastion\Bastion.xml”) and set the IP and port on which the Bastion will listen on.

Configure the Certificate
under ssl::serverCert configure the certificate the bastion will be using.
There are 3 modes of loading the certificate:
Certificate store - change the path to the following format(change the thumbprint after the '#' to your particular settings):
<path>store:/LocalMachine/My/#667B3CC8ADF2B13BB9F4BF258F3232C337EE3389</path>
Note:
Sometimes you will copy unintended hidden characters when copying from the Windows Certificate store due to bad ANSI conversion.
We recommend deleting the '#' sign and two additional characters and retype them manually in order to avoid complications.Local unencrypted .crt and .key file - add the following tags
<path>cert\DemoServer.crt</path> <!-- Relative path  to certificate -->
<privateKey>cert\DemoServer.key</privateKey> <!-- Relative path  to key-->
PFX file - add the following tags
  <path>cert\DemoServer.pfx</path> <!-- Relative file to pfx -->
  <password encrypted="false">123456</password> <!-- PFX password →
You can configure in addition whether the Bastion will require a client certificate, this is relevant when applying CAF(used for enforcing additional certificate factor)
For more information see the documentation for Cloud Conditional Access
This can be configured under the <clientCert> tag with the following options
| ignore | Bastion shouldn't ask for a client certificate. |
|---|---|
| ask | Bastion should ask for a client certificate, but not require it. |
| require | Bastion should require a client certificate (connection will fail if no client certificate is provided) |
Channels
A Channel is a configuration that specifies the particular route headers to a single internal host and the associated filters that will process the traffic.
You can have a channel without any filter. In this case, the bastion will just reroute the traffic without attaching any additional filtering.
The filter is loaded automatically from a subfolder based on the DLL name without the extension
Channel Structure
The following XML describes the general structure of a channel
<channel name="[Unique name for the channel]" listener="[listener]">
	<!--for which hosts this channel will apply-->
    <externalHosts>
    	<host>PublicDNS1.domain.com</host>
		<host>PublicDNS2.domain.com</host>
    </externalHosts>
    <!--Where to publish connections on this channel -->
    <publish>
    	<host>[InternalHost.corp.domain.com/IP]</host>
        <sslPort>443</sslPort>
        <convertTo>keep</convertTo>
    </publish>
    <filters>
    	<filter>[Folder]\[DLL name without ext]</filter>
	</filters>
</channel>
External host - externalHost
The external hostnames the Bastion will redirect the traffic from
Example
<externalHosts>
	<host>PublicDNS1.domain.com</host>
	<host>PublicDNS2.domain.com</host>
</externalHosts>
You can have multiple hosts per channels
Target hosts - publish
The FQDN or IP of the host to which the Bastion will publish the traffic from the external hosts
It is built from:
- host - the host to which the traffic will be published to
- sslPort - the listening port on the published server host
- convertTo - Convert HTTP traffic to HTTPS
Example
<publish>
    <host>[InternalHost.corp.domain.com/IP]</host>
    <sslPort>443</sslPort>
	<convertTo>keep</convertTo>
</publish>
Filter - filter
The relative path of the filter.
The base path is taken from the previous XML element filters:: path
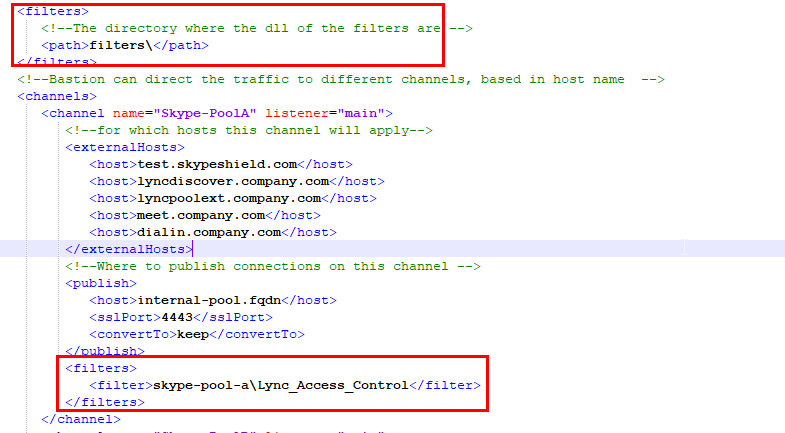
 <filters>
      <!--The directory where the dll of the filters are -->
      <path>filters\</path>
   </filters>
Example
<filters>
	<filter>[Folder]\[DLL name without ext]</filter>
</filters>
Skype Channel
A redirection to a Front-End Skype pool, one pool must have the lyncdiscover and the general front-end services(meet, dialin) and a separate channel for every separate pool with just the pool external address.
In case of an environment with multiple pools The traffic will be rerouted automatically
Example 1: A primary channel can be found in the following:
<channel name="Skype-PoolA" listener="main">
         <!--for which hosts this channel will apply-->
         <externalHosts>
            <host>test.skypeshield.com</host>
            <host>lyncdiscover.company.com</host>
            <host>lyncpoolext.company.com</host>
            <host>meet.company.com</host>
            <host>dialin.company.com</host>
         </externalHosts>
         <!--Where to publish connections on this channel -->
         <publish>
            <host>internal-pool.fqdn</host>
            <sslPort>4443</sslPort>
            <convertTo>keep</convertTo>
         </publish>
         <filters>
            <filter>skype-pool-a\Lync_Access_Control</filter>
         </filters>
      </channel>
Exmaple 2: A topology with two Front-End pools
<channel name="Skype-PoolA" listener="main">
         <!--for which hosts this channel will apply-->
         <externalHosts>
            <host>test.skypeshield.com</host>
            <host>lyncdiscover.company.com</host>
            <host>lyncpoolext.company.com</host>
            <host>meet.company.com</host>
            <host>dialin.company.com</host>
         </externalHosts>
         <!--Where to publish connections on this channel -->
         <publish>
            <host>internal-pool.fqdn</host>
            <sslPort>4443</sslPort>
            <convertTo>keep</convertTo>
         </publish>
         <filters>
            <filter>skype-pool-a\Lync_Access_Control</filter>
         </filters>
      </channel>
      <channel name="Skype-PoolB" listener="main">
         <!--for which hosts this channel will apply-->
         <externalHosts>
            <host>lyncpoolext.company.com</host>
         </externalHosts>
         <!--Where to publish connections on this channel -->
         <publish>
            <host>internal-pool2.fqdn</host>
            <sslPort>4443</sslPort>
            <convertTo>keep</convertTo>
         </publish>
         <filters>
            <filter>skype-pool-b\Lync_Access_Control</filter>
         </filters>
      </channel>
For each additional pool you need to have a different folder
EWS - for EWS protection define another channel and point it to the Exchange server
A channel for the Exchange traffic in case EWS protection is applied, you can have separate channels for different Exchange servers
Example
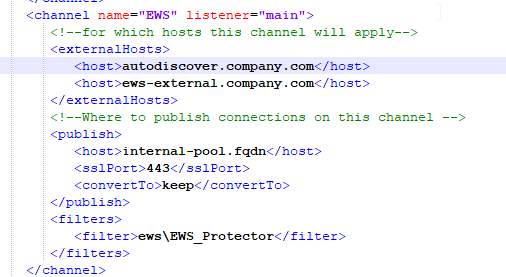
<channel name="EWS" listener="main">
	<!--for which hosts this channel will apply-->
	<externalHosts>
		<host>autodiscover.company.com</host>
		<host>ews-external.company.com</host>
	</externalHosts>
	<!--Where to publish connections on this channel -->
	<publish>
	    <host>internal-pool.fqdn</host>
    	<sslPort>443</sslPort>
        <convertTo>keep</convertTo>
    </publish>
    <filters>
    	<filter>ews\EWS_Protector</filter>
    </filters>
</channel>
Office Online Server
A channel for the Office Online Server with a LAC Filter
Example
<channel name="EWS" listener="main">
	<!--for which hosts this channel will apply-->
	<externalHosts>
		<host>oos.company.com</host>
	</externalHosts>
	<!--Where to publish connections on this channel -->
	<publish>
	    <host>oos.corp.company.local</host>
    	<sslPort>443</sslPort>
        <convertTo>keep</convertTo>
    </publish>
    <filters>
    	<filter>OOS\Lync_Access_Control</filter>
    </filters>
</channel>
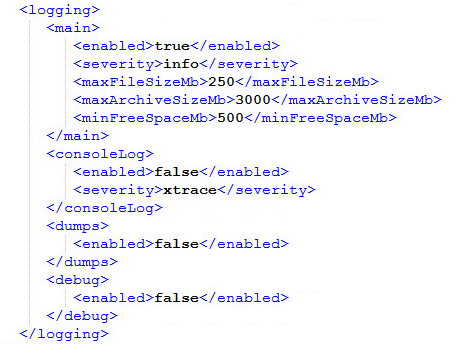
Logging
There are 3 types of logging enabled by the Bastion:
- main - Logging to a text file
- console - Logging to console, useful when wanting to debug a change in the configuration(logging can be seen by opening the Bastion in cmd with the option bastion.exe console)
- debug - Not relevant
A section for configuration of the logging
| Option | Modes | Explanation | Scope |
|---|---|---|---|
| enabled | true/false | Whether logging is active | All |
| severity | info/xtrace/debug | Logging level | main(text log)/console |
maxFileSizeMb | Size in MB | The max size of the file for the active file in MB | main(text log) |
| maxArchiveSizeMb | Size in MB | The max size of the archived logs in MB | main(text log) |
| minFreeSpaceMb | Size in MB | The minimum free space to enable logging in MB | main(text log) |
Severity levels
| info | Basic information of loading and operation (recommended for production usage) |
|---|---|
| xtrace | More information regarding the routing |
| debug | Full information of the routing with a listing of all the |
Configuring filters
After setting the Bastion XML you will be required to configure the Filters configuration using the following articles: